THE BUDDY SYSTEM

VISIT THIS WEBSITE FOR THE BUDDY SYSTEM
MOSTDI INNOVATIONS

http://mostdi.net/
+60169772257

OR CALL

ZHOU SPECIALIST DENTAL & IMPLANTOLOGY CLINIC
+60391026488 OR +60122436225

Total Pageviews

Search This Blog

Popular Posts

Thursday, July 12, 2012

IMPLANTATION AND EXPLANTATION ON PATIENT'S INSISTENCE

We placed in the upper anterior implants carefully and everything healed uneventfully. 
However, when the patient returned, he insisted that we remove them, the reason being that,
"He just could not accept them as part of his mouth and body!"
This was a realization that he had only after he had the implants placed.


After numerous attempts to persuade him otherwise, we finally accepted the fact that the patient for some reason beyond us, cannot accept the dental implants as part of his mouth and body. By then, the implants were fully osseointegrated and ready for harvesting and prosthodontics. 

So near, yet so far!!!!
Rest assured, we tried our level utmost to convince the patient how simple the prosthodontics were and how much he already paid and what a boon a set of fixed teeth as compared to his dentures were.


With all the preliminary exercises in persuasion and explainations done conscientiously, we got the patient to sign a carefully worded consent form indemnifying us from all the consequences of his thoroughly informed consent. With that in safely in the drawer, we proceeded to grant the patient his wishes.


We exposed the implants and tried to unscrew them first. 
One came out just by unscrewing them at about 50 ncm, my guesstimate.
One had to be trephined almost the whole length before it could be removed.
One was trephined to about 2-3mm depth and then it was elevated gently out.
We stitched it up and the wound healed uneventfully.
The patient wore back his old set of dentures, happily relieved..... I think.
We never saw the patient again because we wrote into the informed consent a clause stating that the patient will not seek any further treatment from us again.

Friday, June 29, 2012

IMPLANT TOGETHER WITH BONE GRAFT

This patient's lower right molar had to be removed due to severe chronic periodontitis and loss of supporting bone. After one month, after the mucosa had overgrown the socket a bit, we inserted the implant the following way:-
  1. We drilled right through the mucosa in a flapless procedure until we hit paydirt.... I mean bone. Unfortunately the first drill went right into the inferior dental canal and there was a gush of blood. The bleeding was stopped with a piece of spongostan and biting on a piece of gauze.
  2. After another 2 months, we went in again flapless again, this time more carefully in avoiding penetration of the inferior dental canal. After tapping the osteotomy and trying in the implant to its full depth, we removed it and made a straight incision along the direction of the alveolar crest.
  3. After lifting the flap bucally and lingually, we curetted the socket thoroughly to gain a raw fresh bony surface. 
  4. We then removed any loose granulation tissue attached to the flaps, screwed in the implant 4.5 by 11mm Ankylos. Bio-Oss was used to fill up the gaps 360 degrees around the implant. No membrane was used. Primary closure was achieved.
Because of some general health issues, we could not complete the case sooner. After almost one year, we screwed on the abutment, cemented on the crown and took an Xray and we had the pleasant surprise of seeing the bone graft substantially replaced by well calcified bone to the maximum level available!!!!!


Tuesday, March 27, 2012

CAN I AVOID A MAXILLARY SINUS LIFT?

IN ANSWER TO THE ABOVE QUESTION IN AN OSSEONEWS DISCUSSION

http://www.osseonews.com/can-i-avoid-a-maxillary-sinus-lift/

http://smalldentalimplants.blogspot.com/2010/12/anatomical-positioning-of-minis-to.html

K. F. Chow BDS., FDSRCS May 7, 2010 at 10:43 am

Dear Dr A,
I guess you are another fictitious Doc with an alphabet. Nevertheless, it is an interesting question.
If you do not want to do a sinus lift, any reason will do though it might not be a good one. I myself once did not want to do it because I hated having to make a large opening into the sinus! And if I can avoid it, I did. So I tried crestal lifts invented by Summers. Works, but often found myself having to spend more time than if I just did a lateral window which is more sure and definitive. There are various ingenious ways nowadays, the latest seem to be the “hatch” technique with a special off centre drill.
However, if you want to avoid all these, there are several ways to avoid a sinus lift altogether:-
* Do a conventional bridge on adjacent teeth. Use the tooth in front and the tooth behind the edentulous space. Or a cantilever might work.
* Place an implant in the tuberosity where there is usually more than enough bone and join it to the natural tooth just anterior to the edentulous space.
* Or use MINIs! Do a tripod. 3 minis with the tips cut off at 5mm length, and build a crown on it.
* 2 or 3 Minis carefully threaded into the walls of the sinus on the buccal and the palatal where there is usually 3-5mm thickness of bone. These technique requires a lot of skill and experience though.
* Use short large diameter fixtures from Bicon, Endopore or some of these Korean makers that come in diameters up to 8mm!
* Or like Dr Richard Hughes suggest…. place in a subperiosteal.
Now all of the above require quite a lot of skill and experience…..maybe you might just want to learn to do a lateral window sinus lift which actually, once you get the hang of it may be actually simpler and surer in results!
Cheers.


Ken Clifford, DDS May 8, 2010 at 9:40 am

Dr Chow – Three questions. 1} Never thought of “cutting off the tips” at 5mm on a mini. How do you do that? 2.}How do you get it to “catch” the threads if the tip is cut off? 3.}I have built several crowns on tripod minis, but I haven’t seen clinical techniques discussed on how to “fix” the parallel problem. Your suggestions?


K. F. Chow BDS., FDSRCS May 8, 2010 at 12:48 pm

Hi Ken,
Since we have only 5mm bone height, we can reduce the threaded part of the mini-implant to 5mm by cutting of 5mm of a 10mm thread. Use a sterile orthodontic cutter. Grip the mini by the collar with a sterile orthodontic pliers or even a tweezer…. and then cut! With experience, you can just cut off 3mm and leave a 7mm threaded part. As you screw it in, it will do a Summers sinus lift.
Always make sure your drill hole is about 0.8 to 1.0 mm in diameter smaller than your mini diameter. If you are using a 2.5mm diameter mini, your last drill should be 1.5mm diameter or even less if your bone is soft. If the drill hole diameter is smaller than your implant diameter, then even if you have cut off the tip, the remaining threads should still bite into the side of the hole and draw in the implant as you clockwise it.
Lastly, you have rightly observed that our current prosthodontic solutions for the minis for both removable and fixed prostheses are still less than satisfactory in terms of simplicity and ease of maintenance. As such, I have developed a system called “THE BUDDY SYSTEM” to try to address the current shortcomings. I will post the sequential write-up in my smalldentalimplants.blogspot.com and will appreciate yours and others advice for any possible improvement. Hopefully, the problem of parallelism can be resolved with a moulding device and that of maintenance of fixed prostheses can be resolved with the use of “cleaning grooves” which I will describe.
Warmest regards and cheers.

Saturday, February 4, 2012

THE RESCUE OF A DENTAL CRIPPLE AND A LIFE TRANSFORMED


When this gentleman who is generally healthy and a smoker to boot requested for help, it was quite a challenge. He could not eat properly because the upper denture tended to fall down and he had only a few lower front teeth left. Cost was not a big issue but he still preferred some savings if possible. 

The options were presented and the choices were between standard implants or minis or a mix of them with the accompanying pros and cons. We started in December 2009 and completed in December 2010. It could have been earlier except that the gentleman had the lowers done first and tried it out for several months before he made the judgement call that minis do work and requested for minis for the uppers as well. 

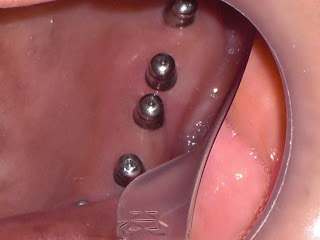
With all the pros and cons discussed and informed consent obtained, we proceeded to place in 12 minis or MOSTDIs as I like to call them. One was lost from the incisor area basically because the anterior ridge was extremely narrow. Nevertheless, 10 was enough. We cemented BUDs( Bridge/crown Underpinning Device) on them which allowed for direct impressions. 

From THE BUDDY SYSTEM described in this blog 
with
 MOSTDIS, MOSTDIBUDS, MOSTDIDADS AND MOSTDIMUMS. 
FIRST AND ORIGINAL PATENTED BY MOSTDI INNOVATIONS PTE LTD

The Lab loved us because they did not have to manipulate all sorts of analogs and whatnots etc.  They just built the bridge directly with some relief around the MOSTDIBUDs and incorporated cleaning grooves to enable removal of all excess cement and regular self maintenance.

THE DENTAL CRIPPLE WAS RESCUED AND HIS LIFE TRANSFORMED


HORRENDOUS!


REMAINING TEETH PRESERVED
ROOT CANALS DONE ON THE LEFT CANINE AND PREMOLAR
CONSERVATION OF SOUND TOOTH STRUCTURE


A HANDSOME UPPER FULL DENTURE MADE


MOSTDIS WITH MOSTDIBUDS PLACED


CEMENT AROUND THE BUDS CAN BE EYEBALLED AND THOROUGHLY REMOVED.
PIC TAKEN A WEEK OR SO LATER SHOWS VERY HEALTHY MUCOSA ALL AROUND THE MOSTDIBUDS/ABUTMENTS


SEE HOW HEALTHY THEY ARE!!


LINGUAL VIEW OF THE LOWER LEFT BRIDGE TO SHOW HOW HEALTHY THE SURROUNDING MUCOSA IS MAINTAINED


OOPS. THIS IS A PIC OF THE DENTURE THAT THE PATIENT WAS WEARING BEFORE THE MOSTDIS WERE PLACED


SEE THE CLEANING GROOVES BUILT BETWEEN ALL THE MOSTDIS


LINGUAL VIEW OF LOWER RIGHT BRIDGE


LOWER COMPLETED 
PATIENT WANTS TO SEE WHETHER MINIS WORK.... TSK


DIRECT IMPRESSION MODELS TAKEN WITH NO NECESSITY OF ANALOGS
SIMPLIFY! SIMPLIFY! A JOBSIAN TRAIT


HERE IT IS MINIS! MINIS! MINIS!
BRING ON THE BRICKBATS
BUT THE PATIENT IS ABSOLUTELY ASTOUNDED AND PLEASED 
AT LESS THAN HALF THE COST OF STANDARDS 
ALMOST NO TRAUMA AND NO BONE GRAFTS
ALL WITHIN TWO MONTHS OR LESS


CLOSE-UPS
THE GUY IS STILL SMOKING AND BITING VERY WELL THANK YOU!


CLOSE-UPS 
THE FIRST IMPLANT SYSTEM DESIGNED TO PROTECT THE EMERGENT MARGIN OF THE IMPLANT AKA THE ARCHILLES HEEL OF ALL DENTAL IMPLANTS
SEE AND LISTEN TO  "THE THREE CRITICAL MARGINS OF IMPLANT DENTISTRY" 
ON YOUTUBE
IT IS A SEMINAL DISCOURSE ON A SUBJECT THAT IMPLANT DENTISTS TEND TO AVOID LIKE THE PLAGUE


HEALTHY! HEALTHY!


USED THE UPPER FULL DENTURE FOR REMOVABLE TEMPORIZATION WITH SOFT LINER
CONCLUDED THAT IT WILL BE BETTER TO REMOVE THE FLANGE AND CEMENT IN THE DENTURE INSTEAD AND REMOVABLE BY THE DENTIST ONLY


OBSERVE THE CLEANING GROOVES


FINAL RESULT


CALLED MICRO-PILING IN ENGINEERING
YOU NEED TO JOIN THEM FOR STRENGTH AND DURABILITY


IF IMPLANT DENTISTRY IS THIS SIMPLE AND SAFE
THEN IT SHOULD BE TAUGHT AT UNDERGRAD LEVEL
AND ALL GENERAL DENTISTS SHOULD AVAIL THEMSELVES TO LEARN AND DELIVER.
IT SHOULD NOT BE CONFINED TO ONLY SOME SPECIALISTS AND A FEW ADVENTUROUS   GPS
CURRENTLY ONLY THE RICH AND THE BRAVE ARE BENEFITING
LET US DEMOCRATIZE IMPLANT DENTISTRY 
AND BENEFIT THE AVERAGE AND THE NOT SO BRAVE!!
THAT MEANS THE REST OF THE WORLD.